3 Fun Educational Engineering Projects for Kids
Have you ever watched kids playing? If you have, you know they are fascinated with the concept of building different items and testing how gravity affects them. They also love taking things apart to see how they work. They were born to be engineers. Research has shown that children learn more effectively if they have been exposed to engineering.
Engineering Involves Math and Science Skills
Engineering is the perfect outlet for children who love to explore math and science. They are not only able to apply what they know, they are able to learn more in-depth knowledge from their experience. Since engineering involves real-world learning instead of just book knowledge, children are able to translate what they have learned into the real-world and make it relevant in their own life. Check out these five amazing engineering projects your kids will love.
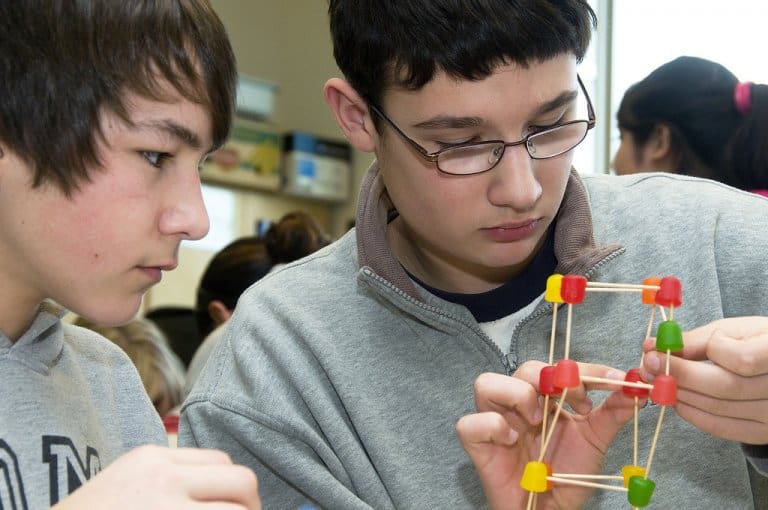
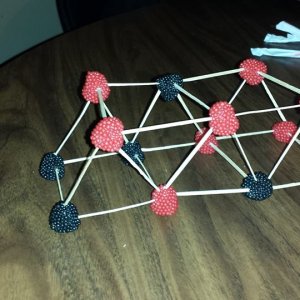
Project 1: Gumdrop Building Structures

This is an engineering project that my son found on Teachers Domain. We have played at length with this project because it is inexpensive, fun, and edible.
The purpose of the activity is to introduce how different shapes affect the stability of the structure. It also allows children to gauge parameters and determine how far they can take the structure before the integrity is compromised.
Defining the Challenge
Materials:
- 10 gumdrops
- 20 toothpicks
Directions:
Use only these materials to create a structure that is capable of holding the weight of a standard textbook.
What Does Your Child Learn?
Your child learns a mixture of mathematics and science. They also learn the basics of shape comparison and physics. This project breaches into engineering and technology by teaching the relationship between building structures and load distribution.
Project 2: Advanced Gumdrop Building Structures – Building a House
The concept of this project is to use triangles as support and to show that building a large, sturdy base will allow a structure to support more weight.
Materials:
- 20 toothpicks
- 10 gumdrops
- 1 – 12 inch standard ruler
- Paper towels
Directions:
Provide this list of questions to help guide your child's building process.
- How could you strengthen the joints you are making?
- What could you do to make the base of the house broader to provide more support?
- Does the number of toothpicks in each gumdrop change the support of the joint?
- How will the shape of your roof affect how we can test the durability?
If you want to make the engineering project more difficult, do not provide replacement materials for toothpicks that break or gumdrops that have been poked too much. If your child knows that their resources are limited, they might take more time to plan their building before starting, which teaches them material conservation.
Project 3: Rubber Band Racer – For Older Kids

Teenage boys are typically race car fans. Using materials you already have around the house, you can help your teenager create an amazing rubber band racer.
Materials:
- 1 skewer
- 2 paper straws
- 2 lollipop straws
- Hot glue gun
- Battery Operated Drill
- Sharp scissors
- 2 large plastic coffee can lid
- 2 small plastic coffee can lids
- Rubberbands
- Permanent Marker
- 1 – 12-inch ruler
Directions:
Cut the lollipop sticks down to 2.5 inches long. Cut the tip off of a wooden skewer so that you have ¾ inch of the tip. Cut the remaining portion of the skewer into 2 – four inch long pieces.
Use the marker to mark the middle of each 4-inch wooden sticks.
Use the ruler and marker to mark the 1-inch and 2-inch points from each end of the straws. Each straw should be marked 4 times.
Use a small drill bit to create holes over each mark on the straws. You will need to fit your skewers and lollipop sticks through the holes.
Using a tiny drill bit, drill a small hole through the ½ way mark on the skewer.
Using the straws, stick the lollipop sticks into the two center holes. This should create a ladder shape between the straws. Hold the lollipop sticks in place using the hot glue.
Drill holes in the center of all four plastic lids. The holes should be wide enough for your sticks to go through. Stick the skewers in the outermost holes in the straws. These will act like the axles for your wheels. Test the wheels on them to make sure they will move smoothly.
The skewer with the hole in the middle should be used as the back axle. Attach the large plastic lids to the back axle using the glue gun. Secure the stick the 3/4” piece of pointed skewer into the hole in the middle of your axle.
Attach the smaller wheels using the same method as above. Test your wheels to make sure that both axles move smoothly.
Use a rubber band, looping it through the lollipop stick on the front axle. Hook the other end of the band around the skewer tip.
Making the Car Go!
Wind the car up by turning the back wheels of the car. This will wind the rubber band around the back axle. Place the car on the ground and it should take off.


Leave a Reply