4 Ways You Can Learn Science Directly From Nature (Pre-K)
There are a lot of ways to learn science. A child does not want to learn science from a book. They want to learn by being hands on and getting dirty. They want to experiment with different things and see what happens. They want to make something!
Here are four ways to learn science directly from nature, that you may have overlooked. Your kids will love seeing their accomplishments, and they will be willing to try these learning experiences over and over to see if they get a different result.
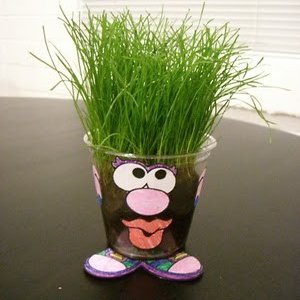
Project 1: Grow Your Own Grass Man
This nature lesson gives your child a chance to grow their very first lawn. Not only do they get to grow their own grass guy, but they get to cut his hair too!
What You Need:
- Plastic Cup
- Permanent Marker
- Items to decorate the outside of your cup (We made ours look like a Mr. Potato Head)
- Potting Soil
- 2 teaspoons of grass seed
- a little bit of water
How to Make Your Grass Man:
- Using the permanent marker, draw a face on your plastic cup. Let your child decorate their cup. Let the decorations dry completely.
- Fill your cup with potting soil, leaving one inch of headroom at the top of the cup.
- Sprinkle your grass seed over the top of your potting soil.
- Cover with more potting soil, leaving one-half inch of headroom a the top of the cup.
- Water your grass man and place him in the window sill to grow. Make sure to water him every few days.
- When your grass man's hair grows too long, you can use scissors to cut his hair.
Project 2: Exploring Dirt and Mud
This is a child's favorite activity, so why not turn it into a science lesson? Children love to play in the dirt, and they really love to play in the mud. But what can they learn from mud and dirt? Follow these instructions and you may learn something too!
What You Will Need:
- Buckets, bowls, or plastic cups
- Tools to dig with
- Supplies to label your samples
- A cookie sheet
- Tweezers
- Magnifying glass
- Sheet of white paper
- Sheet of black paper (folded in half)
- Sieves (more than one, each having different sized holes)
Project 3: How to Really Explore Dirt and Mud
As you go through your yard, try to find different types of dirt. The types of dirt you will want to find are:
- Dry dirt that is hard packed
- Loose soil
- Gravel
- Silty dirt
- Sandy dirt
- Dirt mixed with clay
- Dirt from under a tree
Collect the samples listed above. Label each one as you collect it so you can keep them in order.
Questions to Ask Your Child as You Go
As your child digs, ask them what the dirt feels like. What do they see?
- How does the dirt they are digging now feel in comparison to the dirt they were digging in the last location?
- Where was the ground hardest?
- Where was the ground softest?
- If they are digging hard packed dirt, ask what the best way to loosen it is. See if they can figure out how to make the dirt softer.
- Is the dirt they are digging dry? Is it moist?
- What does each sample of dirt feel like?
- What does each sample of dirt smell like?
- What makes the dirt they collected from under the tree different from the dirt they collected in other places?
- When they were digging, did they see any leaves? Did they see twigs? Did they see seeds? Did they see any clues that animals had been there before?
- When you are done, release any little critters you found in your dirt samples. Put the samples in small Tupperware containers with lids. Label them according to where your child dug it up, and what date it was dug up. Put it in your preschool science collection for later use.
Project 4: Exploring Mud and its Properties
Open the containers of dirt that you collected. Take a couple of teaspoons out of each one and place them in plastic cups that are labeled according to what the Tupperware container states.
Have your child mix a little bit of water into each type of dirt. They can also create unique mud mixtures by mixing their samples.
Use some of the mud to create mud pies and leave them in the sun to dry out. After a few days, go back to the dried mud pies to discover how they have changed and what has changed about the dirt's composition.
After your child has had a chance to investigate the dry mud pies, ask them to try and we the mud pies.
Questions to Ask Your Child
- What happened when you added water to the sand?
- What happened when you added water to the topsoil? What about the other types of dirt?
- Does the dirt smell different when you add water to it? What does it smell like?
- Which kind of mud is the smoothest?
- Which kind of mud is the stickiest?


Leave a Reply